Transferring Inventory
This information is for Rexall pharmacies only.
Sometimes medication needs to be transferred to a non-Rexall/PharmaPlus pharmacy. In these cases, the process of transferring inventory is done with Propel Rx and POS.
If transferring inventory to a Rexall/PharmaPlus pharmacy, use Rx Inventory Manager on the Store Portal.
There are two parts to complete when doing a Non-Rexall store-to-store transfer:
Part 1: Creating a Pharmacy Profile
To send a store-to-store transfer, a Patient Folder must be created for the receiving pharmacy.
To create a Patient Folder:
-
From the Workbench, select the Patient navigator button.
-
Search for the pharmacy.
The last name will usually be the store name, and the first name will usually be the store number.
If a Patient Folder already exists, proceed to Part 2: Filling a Cash prescription.
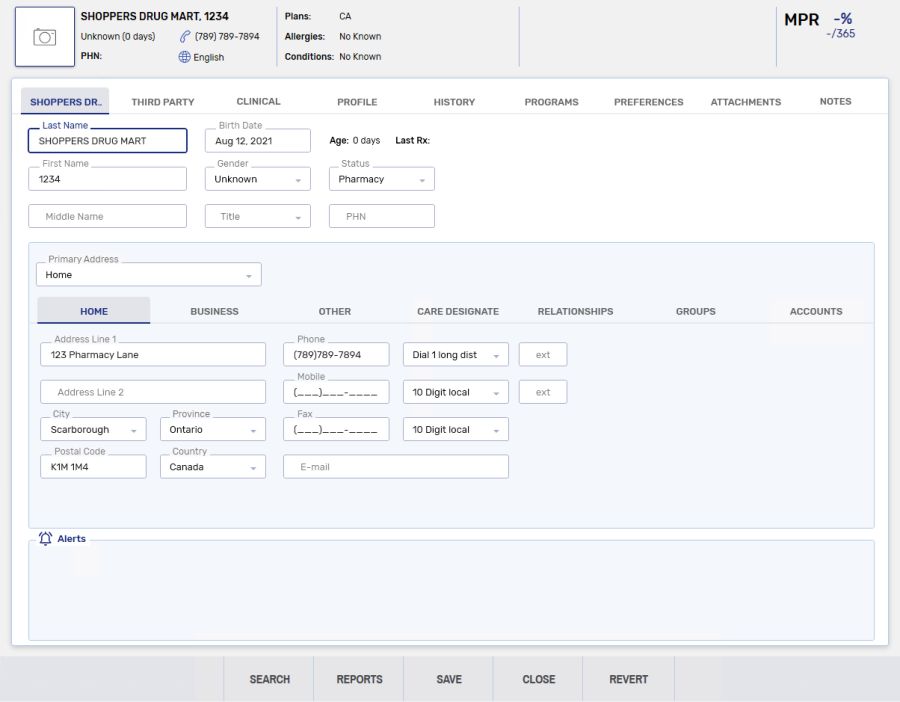
If there is no existing Patient Folder, select New. A blank Patient Folder appears.
-
Enter the following information:
-
Last Name - store name
-
First Name - store number
-
Birth Date - current date
-
Gender - Unknown
-
Status - Pharmacy
-
Address information of the pharmacy

-
-
Select Save.
-
Proceed to Part Part 2: Filling a Cash prescription.
Part 2: Filling a Cash Prescription
To fill a cash prescription:
-
From the pharmacy's Patient Folder, select the Profile tab.
-
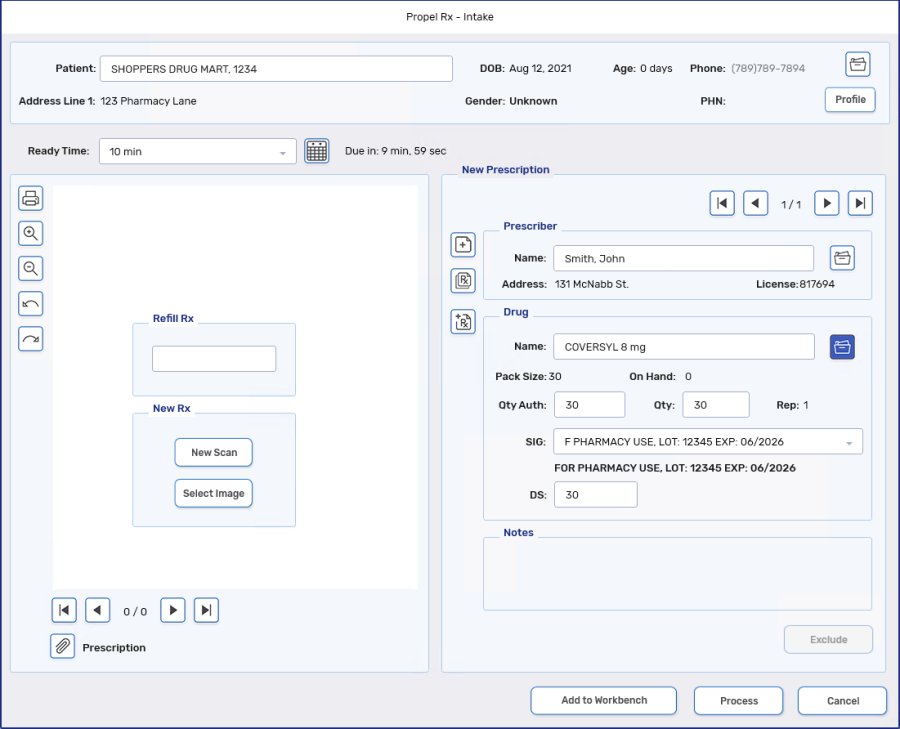
Select Intake. A blank Intake window appears.
-
Enter the following information:
-
Prescriber - the pharmacist that is transferring the drug.
-
Drug - DIN or name of the drug that is being transferred.
-
Qty Auth, Qty and DS - quantity of the drug being transferred.
-
SIG - F PHARMACY USE, LOT:______ EXP: _______

-
-
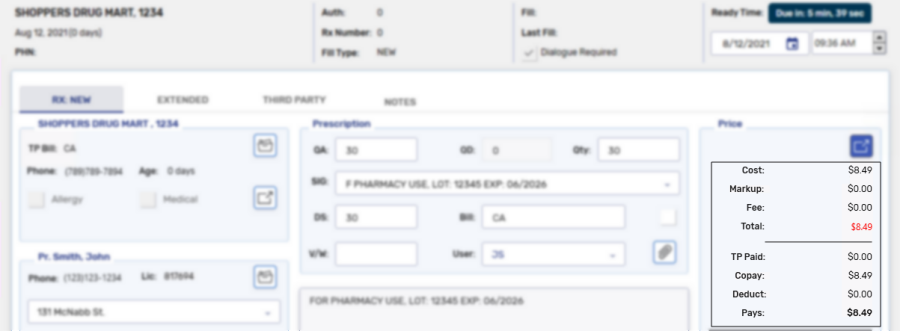
Select Process. The Rx Detail window appears.
-
Verify the following information:
-
Bill - CA
-
Markup and Fee = $0.00

-
-
Select Process to adjudicate the prescription.
-
Complete the prescription through Packaging, Technical Validation and Clinical Review.
-
When the receiving pharmacy picks up the prescription, or it is delivered, scan the prescription out of the POS till as usual.
There are two parts to complete when doing a Non-Rexall store-to-store transfer:
Part 1: Create a Non-Retail Group
Creating a non-retail group allows the receiving pharmacy to be created as a facility patient, meaning prescriptions filled for the pharmacy are not submitted to PharmaNet.
To create a non-reatail Group:
-
From the Workbench, select the Batch Manager navigation button
 . The Batch Manager window appears.
 -
Select the Groups tab.

-
Use the Filter textbox to filter the Groups tab to ensure a Group has not already been created for the pharmacy.
-
If a Group already existing, proceed to Part 2: Filling a Cash prescription.
-
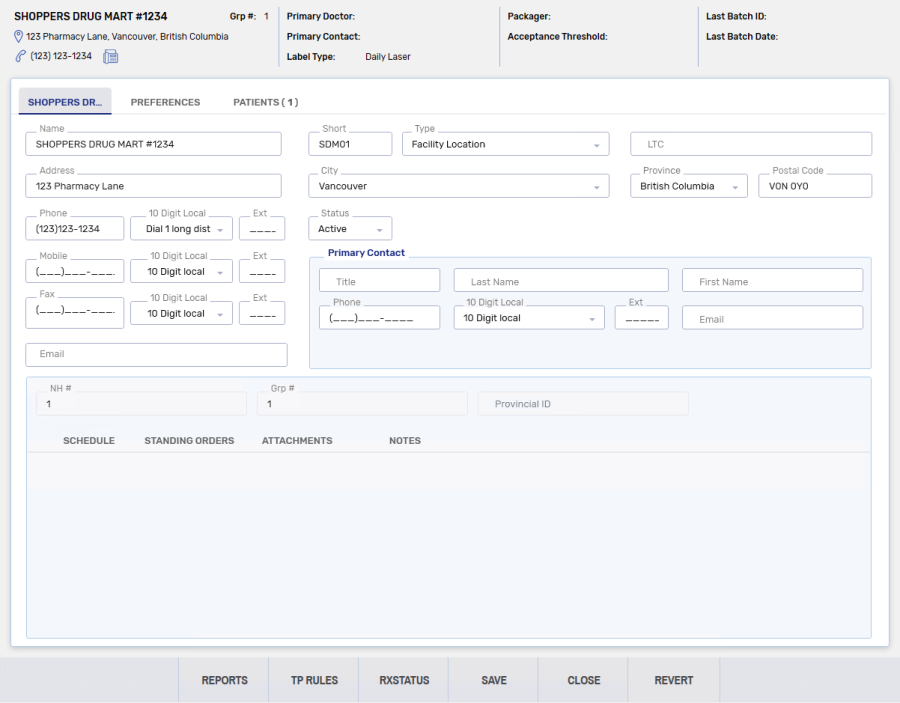
If a Group does not already exist, select New. A blank Groups Folder appears.
-
-
Enter the following information in the Main tab:
-
Name - pharmacy name
-
Short Name - maximum 5 characters
-
Type - Pharmacy
-
Pharmacy address information

-
-
Select Save.
-
Select the Patient tab.
-
Highlight the facility patient and select the folder icon
 .
. 
The Patient Folder opens to the Third Party tab.
-
Highlight the NC - Nursing Charges Third Party and select Remove.

A warning message appears.
-
Select Yes. The warning message closes.
-
Select Save.
-
Proceed to Part 2: Filling a Cash prescription.
Part 2: Filling a Cash Prescription
To fill a cash prescription:
-
From the pharmacy's Patient Folder, select the Profile tab.
-
Select Intake. A blank Intake window appears.
-
Enter the following information:
-
Prescriber - the pharmacist that is transferring the drug.
-
Drug - DIN or name of the drug that is being transferred.
-
Qty Auth, Qty and DS - quantity of the drug being transferred.
-
SIG - F PHARMACY USE, LOT:______ EXP: _______

-
-
Select Process. The Rx Detail window appears.
-
Verify the following information:
-
Bill - CA
-
Markup and Fee = $0.00

-
-
Select Process to adjudicate the prescription.
-
Complete the prescription through Packaging, Technical Validation and Clinical Review.
-
When the receiving pharmacy picks up the prescription, or it is delivered, scan the prescription out of the POS till as usual.